Showing posts with label DIY. Show all posts

Tuesday, July 30, 2013

DIY Fabric iPhone Case Tutorial

Putting a phone on a plate seems like a bloggy thing to do, right?

When I first got my iPhone over two years ago, Chris said that I had to get a case because there was no way it would survive without one with me as the owner. He knows me. I chose a thick black leather case because I thought it looked business-y which would be perfect for whatever job I ended up landing and it and would go with every thing. It lasted for a year and five months until we went to Ireland. We ate lunch outside in a teeny tiny town, I remember taking a photo, getting into the car, falling asleep as I always did and then when I woke up, the iPhone case was gone! I couldn't find it anywhere in the car. Surprisingly, I didn't break my phone during the remainder of the trip. 

After coming home in September, I purchased this case: a Hex case in khaki canvas. When I spend a lot of money on something (I think $35 on a phone case is definitely expensive), I want it to be classic and go well with whatever I'm doing so I was happy to find it. Starting in May, the canvas just started to fall apart. I just ignored its ratty nature until I had fraying strings occasionally block Kodak moments. That wouldn't do for this mama paparazzo. No siree. 

But what to do? I didn't want to spend money on another case! And so the fabric case cover was born. I originally tried using some scrap fabric that I had at home which worked perfectly fine, but when I was perusing a local fabric store I came across this blue and white floral sample that made me tear off my first fabric cover without a second thought. I'm like Tess, I love blue and white. Otherwise, I had everything else on hand so it was a cheap makeover, which warranted my new found delight of having a non-classic phone case. 

Here is a tutorial. It is incredibly easy, but it looks like a lot only because I always prefer tutorials that are excessive on the details ... much like my storytelling. 
Plus an X-acto knife! 


Materials: phone case, fabric (about 6in x 8in), Mod Podge (shiny or matte), paint brush, X-acto knife

1. Tear the old fabric off of your case. 
2. Position the fabric pattern to your liking. 
3. Paint the Mod Podge on to the bare case. 
4. Place the fabric onto the case and then paint even more Mod Podge over the fabric.
5. Let dry. You could probably wait only 15-20 minutes, but I worked on this throughout the day in between Ryan spilling spices, getting into the freezer, etc. so I normally waited at least an hour before returning to the project.
6. It is dry! 
7. Turn the phone case over. Paint glue on the sides and on the inside.
8. Fold the fabric over and shape to the case.
9. Using the X-acto knife, trim the excess fabric on the sides.
10. Press the fabric against the sides again and repaint with glue. Let dry.
11. Trim the excess fabric with the knife. 
12. Fold the fabric at the top and bottom as if you were wrapping a present.
13. Then old the fabric over the case. 
14. Mod Podge the top and bottom of the phone case.
15. Mold the fabric to the corners.
16. Trim the excess fabric using scissors.
17. Continue trimming the fabric with the X-acto knife.
18. Mod Podge again! Press the fabric down as much as you can and let dry.
19. When dry, turn the case over and carefully use the X-acto knife to cut out the fabric around the camera hole of the case. Be sure to do this at the end when the fabric has been painted with Mod Podge multiple times because it won't fray. 
20. Turn back over and trim, trim, trim until your iPhone perfectly fits into the case. This will take some trial and error, especially at the corners.
21. Once you know that your iPhone will fit, take the phone out and ... you guessed it, another coat of the that magic Mod Podge. Let dry.
22. Put your phone back in and enjoy!

So go out, try it and then report back to me with a bouquet of mirror selfies.

Tuesday, April 9, 2013

How to Make a Baby Bow Tie


As I mentioned in last week's Five Favorites, I kind of have a thing for making bow ties for my little boy. Not only are they adorable, but it covers up the fact that his neck is too fat for his top button to fasten. That's not really a problem (at all since I also think that is adorable...what a mom), but, nevertheless, it is a plus!

I took some photos when I was making Ryan's bow tie for the wedding we went to this weekend so I now have a bow tie tutorial for you. You know, just in case the bow tie bug bites you as well. It is incredibly easy, and if you don't have a sewing machine, you can always use a hot glue gun or some Wunder Under.

What you need:
- material of your own choice
- interfacing (I used a fusible medium weight). This is key! Ryan's first bow tie was a floppy disappointment since I didn't use it.
- scissors
- matching thread and needle
- short length of 1 in velcro
- safety pin

1. Wash your material. I learned my lesson the first time that I didn't wash the material first, put the bow tie on a baby that was drooling buckets and watched the red, green and white bow tie turn into a red, green and pink one.
2. Press your material.

3. Cut out the pieces needed. I played around with the proportions until I came up with a size I was happy with for Ryan. Ryan is 15 months old and 32 in tall so these measurements are for that.
     - Bow:
           - Fabric - 10 in by 5 in
           - Interfacing - 10 in by 2 in
     - Neck strap:
           - Fabric - 20 in by 3 in
           - Interfacing - 20 in by 1 in
     - Center: 3 in by 3 in
     - Velcro: - 1.5 in by 1 in (both sides)
4. Take the piece of fabric for the bow and fold it hot dog style with the right side on the inside.


5. Sew down the open side with about a 1/4 in seam.


6. Take your safety pin, fasten it to the top side of one end, then turn it on itself and slide it through the tube. Turn fabric right-side-out.


7. Now take the safety pin and fasten it to the piece of interfacing for the bow. Slide the interfacing through the tube of fabric. Press.

8. Fold with ends overlapping like in the photo below.

9. Sew down the middle. I didn't measure exactly where the middle was so I just pushed the sides up on each end of the foot and eyeballed it.

10. Onto the center! Fold in half with the right sides together and sew with a 1/4 in seam. Turn inside out using the safety pin. Press.


11. Now fold the neck strap piece hot dog style with the right side on the inside. Sew together with a 1/4 in seam. Turn inside out like with the other two pieces and then use the safety pin to slide the interfacing through. I tore my interfacing a few times before I was able to get it successfully through so roll the interfacing on the end a bit, put the safety pin through that end and then pull through. The thicker bit of interfacing won't tear as easily. Press.
12. Now fold one end of the neckstrap to cover the seam.

13. Take one piece of velcro and place it on top of the folded end. Sew the velcro to the neckstrap.

14. Fold the other end of the neck strap over, then take the remaining piece of velcro and sew it on. Make sure to do it on the opposite side!

15. Take the bow piece and gather it in the middle to your liking. Wind a piece of thread around the center to keep it in place.

16. Now place the bow on top of the center piece. Then place the neckstrap on top of the bow.

17. Wrap the center around as tight as you would like it and whip stitch together.

18. Repeat with the other end of the center.

And there you go! Your DIY bow tie.


Monday, February 18, 2013

How to Make a Pom-Pom Ball

Now that I have a wee one, I think that hats with pom-poms are basically the most adorable part of winter. I know, such an important opinion to have. Here is the product of my obsession:

If you can believe it, the pom pom was actually bigger at first, but Chris let me know that it might be a little too big if it is bigger than Ryan's head...

Ana over at Time Flies When You're Having Babies is hosting a Cabin-Fever-Close-to-Valentine's-Day-Craft link up so I made a little tutorial on how to make a pom pom...and a huge one at that.

1. Get your supplies together: yarn, scissors and something to wrap the yarn around. You could use just one skein of yarn, but I wanted to use pink and white to add a little Valentine's to this pom pom for the link up. I also wanted to make a honking big pom pom (hope that doesn't sound inappropriate?) so I decided to use a mini football for the wrapping since it has a greater circumference than my hand. You could easily use your hand or a few fingers if you want a smaller one.
2.Cut three strands of yarn and set them aside. If you are making a smaller pom pom, you probably only need one strand of yarn. I set aside three to anchor it to the hat better. Less strings + huge pom pom = sad, leaning pom pom
3. Start wrapping. 
4. Keep going!

5. And going! 

6. Remove the wrapped yarn.

7. Place the wrapped yarn over one of the saved strands. 

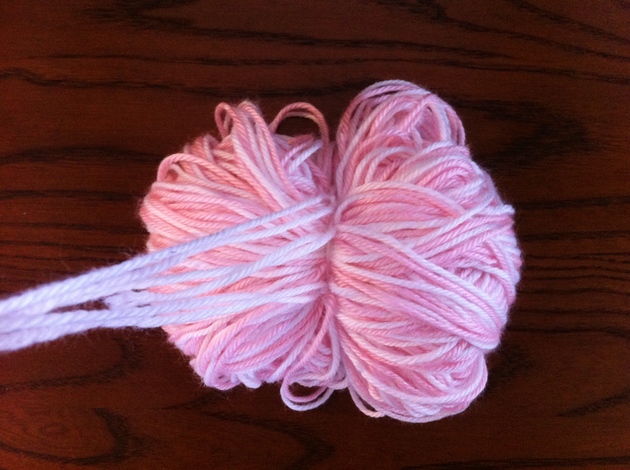
8. Tie the string very tightly around the yarn. 

9. Add the extra strings!

10. Take your scissors and cut the loops on one side.

11. Keep cutting!

12. Once you are finished with the first side, move on to the next side. 

13. You have a pom pom! However, it looks like a five year old gave it a hair cut.

14.So take the scissors and try to repair the haircut. Be careful to not cut the long strings that will be needed to attach the pom pom to the hat.

15.And voila! A nicely groomed pom pom just waiting to adorn a hat. 

16.Attach to the hat (I just tied it and then weaved in the ends), and go fawn over its cuteness. 

For more crafts, head on over to see Ana's link-up!